(Ads will not print.)

Showing posts with label Fruit. Show all posts

Mini Blueberry Cheesecakes

If you don’t have a removable based cheesecake pan, you can use a muffin pan lined with muffin / cupcake cases, and follow the above instructions. The top of cheesecakes will fall a bit when they cool down. The concave surface can help to hold the blueberry coulis nicely.

Prep time: 15 mins
Cook time: 20 mins
Yield: 12-cup mini cheesecake pan - each cavity sized 5cm (surface diameter) x 4.5cm (bottom diameter) x 3.5cm (height)

Ingredients:
  • 1 packet (150 gm) Oreo sandwich cookies, cream fillings removed
  • 50 gm melted butter
  • 250 gm cream cheese block
  • 60 gm caster sugar
  • 1 large egg, about 65 gm
  • 100 ml thickened cream
  • 20 ml lemon juice
  • 1/2 tsp vanilla extract
  • fresh blueberries, for garnish
Blueberry coulis ingredients:
  • 100 gm blueberries
  • 20 gm caster sugar
  • 2 tsp lemon juice
  • 2 tsp cornflour / corn starch
  • 1 Tbsp water
Method:
  1. Preheat oven to 170C/335F.
  2. Put Oreo cookies into a food processor and pulse to fine. Add melted butter and process a few seconds until well combined.
  3. Divide the Oreo mixture evenly. Spoon about 2 tablespoons of cookie mixture into each greased cavity of the cheesecake pan. Use the flat end of a rolling pin, the back of a spoon, or your finger tip to press lightly and level the surface. Set aside.
  4. Use an electric mixer to beat cream cheese and sugar until smooth. You might need to scrape down the sides of the bowl to mix completely. Add the egg and mix well, followed by thickened cream, lemon juice and vanilla extract. Beat until well combined and smooth. Spoon the cream cheese mixture over each Oreo base. Bake in the preheated oven, for about 20 minutes.
  5. Meanwhile, prepare blueberry coulis: Use a small sauce pan, cook the blueberries, sugar and lemon juice over medium-low heat, until the blueberries starts to turn soft and break down. Combine cornflour and water well. Pour over the blueberries bit by bit, stir constantly, until you get the desired consistency. Remove from the heat and let it cool down. You might like to chill it in fridge, covered with plastic film until you need it.
  6. Remove the cheesecake pan from the oven. Let it cool on a wire rack. Carefully remove the cheesecakes (as the above picture shown) and take disc off of the bottom of the cheesecakes using a butter knife. Store in an air-tight container and chill in fridge until completely set. When serving, drizzle blueberry coulis on top of each cheesecake and place a fresh blueberry, or as many as you like.

©2026 Christine's Recipes - https://en.christinesrecipes.com/

Roast Pork Belly with Apple Puree and Cider Vinegar Vinaigrette

This recipe is adapted from Audra Morrice, contestant of MasterChef Australia, season 4.

Prep time: 40 mins
Cook time: 60 mins
Yield: 4 serves

Ingredients:
  • 600 gm roast pork belly (refer to this previous recipe)
  • Apple puree:
  • 2 granny smith apples, cored, peeled and chopped
  • Juice of half a lime
  • 1 tsp sugar
  • 1 to 2 Tbsp water
  • Honey cider vinegar glaze:
  • 1/4 cup honey
  • 1/4 cup cider vinegar
  • Cider vinaigrette:
  • 2 tsp Dijon mustard
  • 1/2 tsp sugar
  • Pinch salt
  • 2 Tbsp water
  • 1½ tsp cider vinegar
  • 100ml grapeseed oil
  • Watercress and baby mache, to serve
Method:
  1. To make the roast pork belly, I used my previous recipe. (Note: For those who are interested in Audra Morrice’s original recipe, please hop over to MasterChef Australia’s official site.) You have to half all the ingredients and skip the five spices powder or just sprinkle a pinch of it if you like an extra fragrance.
  2. For apple puree, place apples in a saucepan with lime juice, sugar and 1 to 2 tablespoons of water. Cover and simmer until tender. Blend in a thermomix or blender until smooth. Check for seasoning.
  3. For glaze, bring both the honey and cider vinegar to a boil over medium heat, simmer until syrup thickens.
  4. For vinaigrette, mix all ingredients and whisk well until emulsified.
  5. To serve, place pork on a serving plate and drizzle with glaze. Add a dollop of apple puree next to pork. Add watercress, top with baby mache and lightly dress with vinaigrette.

©2026 Christine's Recipes - https://en.christinesrecipes.com/

Apple Raspberry Crumble

The crumble is one of the popular, simple baked desserts. It perfectly goes with any fresh or frozen fruits you like.

Prep time: 15 mins
Cook time: 15 mins
Yield: 3 to 4serves

Ingredients:
  • 2 apple, green or red as you like, diced
  • 2 Tbsp caster sugar, or to taste
  • 4 Tbsp water
  • 1 Tbsp fresh lemon juice
  • 1/4 tsp cinnamon, optional
Sauce ingredients:
  • 100 gm raspberry, fresh or frozen
  • 1 Tbsp caster sugar
  • Crumble ingredients:
  • 100 gm plain flour
  • 3 Tbsp brown sugar
  • 1/2 tsp baking powder
  • 3 Tbsp rolled oats
  • 60 gm butter, chilled and diced
  • yoghurt, to taste
Method:
  1. Preheat oven to 180C/356F.
  2. Use a small saucepan, put diced apple, sugar, water, lemon juice and cinnamon and mix well. Cook over low heat until the sugar is dissolved completely and the apple turns soft. Transfer into a bowl. Let it cool down.
  3. Put raspberry and sugar into the saucepan. Cook over low heat until sugar is completely dissolved and raspberry starts to break down. Remove from heat. Let cool. Pass raspberry mixture through a sieve to strain the seeds if you like.
  4. In a large mixing bowl, combine flour, brown sugar, baking powder and oats well. Use your fingertips to rub butter into the flour mixture until the mixture resembles coarse breadcrumbs. Transfer the mixture on a baking tray lined with baking paper. Spread evenly. Bake in the preheated oven for about 15 to 20 minutes. Remove from oven. Loosen it up with a fork. Carefully transfer the crumbles with baking paper onto a wire rack and let cool completely.
  5. To serve, spoon raspberry sauce, cooked apple dices into individual glasses. Add yoghurt, Sprinkle the crumble mixture over. Enjoy!

©2026 Christine's Recipes - https://en.christinesrecipes.com/

Banana Apple Muffins

Banana Apple Muffins01

Happy New Year, everyone! Before the new year’s eve, I finally uploaded the last batch of recipes and photos to my publisher. Right at the moment I hit the “upload” button, I started feeling like over the moon, so released. I can’t wait to see my first cookbook in print. Thanks so much for all your support and leaving encouraging words on my fan page and blog.

Here comes one of my favourite snacks, cup cakes, as the first blog post in 2012. They are easy to whip up in the last minute. This time I tried the new muffin tray bought from Ikea. It got deeper holes, so the cup cakes took a bit longer baking time. I was very pleased with the tall, and gorgeous looking of these cup cakes as much as I love their taste. The banana and apple are perfect partners to make me an enjoyable and delicious snack as a reward to myself whenever I finish a project.

Banana Apple Muffins (Printable recipe)
By Christine's Recipes
Prep time: 15 mins
Cook time: 30 mins
Yield: Makes 12(prepare a lined 12-hole muffin tray)

Ingredients:
  • 1 apple, about 125 gm
  • 1/4 tsp cinnamon powder
  • 2 large ripe bananas, about 320 gm
  • 60 gm melted butter
  • 100 gm sugar
  • 1 egg, beaten
  • 125 ml milk
  • 240 gm cake flour
  • 1/4 tsp baking soda
  • 1 tsp baking powder
  • 1/8 tsp salt

Banana Apple Muffins Procedures

Method:
  • Prepare oven at 175C/350F.
  • Peel and deseed the apple. Cut into about 1cm dices. Mix with the cinnamon powder. Set aside.
  • Use a large spoon or a food processor to mash the banana into paste. Add the melted butter, sugar and egg. Combine well. Stir in the milk.
  • Combine the flour, baking soda, baking powder and salt well. Sift into the banana mixture in 3 batches. Lightly combine all ingredients with a spatula or balloon whisk between each addition. Don’t over stir the batter because you don’t want your cup cakes turn hard as gluten forms inside. Mix in the diced apples.
  • Spoon and divide the batter into the lined muffin trays. Bake in the preheated oven for about 30 to 35 minutes, or until cooked through. Test with an inserted needle that comes out clean. Remove from the oven and let them cool on a wire rack. Enjoy while the cup cakes are still warm.
Banana Apple Muffins02

Notes:
  • The holes of my muffin tray are deep that helps make high, slim cup cakes. The baking time is a bit longer than those with wider holes. But I like the tall, gorgeous looking cup cakes.
  • If you use wide and flat muffin tray, adjust the baking time accordingly.

©2026 Christine's Recipes - https://en.christinesrecipes.com/

How To Juice a Pomegranate (Easy and Quick) + Bookdeal News

Pomegranate01

This draft of this post has been sitting way too long in my folder. Finally, I managed to edit and hit the publish button and get it alive on my blog. It’s been quite an exciting and busy fortnight since I officially got a bookdeal from a large, prestige publisher. The theme of my first cookbook will be simple recipes for home cooks, with many of them are classic Hong Kong dishes that I grew up with. Please bear with me for my posting backlogs.

Back to my favourite fruit, pomegranate. Pomegranate juice is a very healthy and refreshing drink in summer. Although it’s still cold down under here, I love making desserts with its lovely juice. After I made the pomegranate soufflé, immediately a fan posted a question about how to juice pomegranate on my fan page.

The arils, wrapped inside the white pulp membranes, compose of edible red-diamond-like flesh and white hard seeds inside. Trying to get the lovely juice from the edible flesh sounds quite troublesome, yet it’s worth the work. Here’s a hack around that I experimented, much easier than I thought.

Pomegranate02

How To Juice a Pomegranate (Printable version)
By Christine's Recipes  
Time: 25 mins  
Yield: 150 ml (depends on how big your fruit is)  

What you need:
  • 1 pomegranate
  • 1 sharp knife
  • 1 large bowl
  • 1 food processor
  • 1 tablespoon
  • 1 fine sieve
How To Juice a Pomegranate

Method:
  • Cut the pomegranate in half.
  • Hold the half pomegranate in your palm with cut side down as picture shown. Place a large bowl underneath. Use another hand to smack the rind with a large spoon. The seeds should eject from the pomegranate directly into the bowl, leaving only a few deeply embedded arils to remove. Repeat this step with another half until you get all the seeds out.
  • Transfer the seeds into a food processor, briefly grind the seeds. Don’t blend too long, because the juice becomes bitter if too many hard seeds inside are broken.
  • Strain the juice through a fine sieve with the help of a tablespoon and lightly press. You’ll get clear and fresh pomegranate juice.
Other helpful posts:

©2026 Christine's Recipes - https://en.christinesrecipes.com/

Pomegranate Sorbet

Pomegranate Sorbet01

The jewelry-like fleshy seeds of pomegranate are the most attractive to me. The seeds contain fabulous sweet, slightly tart flavour, very suitable for making refreshing juice for summer days. Well, it’s still winter here, so the first idea that came up in my mind was to make a warm soufflé to end our dinner with one of the giant pomegranates sent by Royal Pom. What else could I make good use with the other giant pomegranate? I am a kind of person who can enjoy ice-cream on a freezing, windy day. Although the weather was quite cold and wet last week, I couldn’t help craving for this beautiful pomegranate sorbet. Again, this pomegranate sorbet served as a perfect ending of my dinner last week.

Pomegranate Sorbet (Printable recipe)
By Christine's Recipes
Prep time: 15 mins
Cook time: 15 mins + 3 hrs freezing time
Yield: serves 2

Ingredients:
  • 2 Tbsp water
  • 1/4 tsp gelatine (or gelatin) powder
  • 150 ml pomegranate juice, fresh or bottled
  • 7 to 8 Tbsp caster sugar, or to taste
  • a pinch salt
  • 65 ml heavy cream
Pomegranate Sorbet03
Method:
  • Use a sauce pan, pour in water, sprinkle the gelatine powder over the top. Let sit for 8 to 10 mins. Turn on the heat and cook over low heat, for about 1 minute or two. Swirl the saucepan occasionally.
  • When the gelatine looks not grainy, add pomegranate juice, sugar. Season with a pinch of salt. Stir well. Simmer until the sugar completely dissolved. Set aside.
  • Transfer the pomegranate mixture into a bowl, chill in a fridge. Stir in the cream. Follow the manufacturer's instructions, blend the mixture in an ice-cream maker until soft and fluffy. Then freeze until firm. Done.
Pomegranate Sorbet02
Note:
  • If not using ice-cream maker, you might like to whisk the mixture with a blender, then freeze until firm. Yet, don’t blend too long, lest too much air incorporated inside.

©2026 Christine's Recipes - https://en.christinesrecipes.com/

Chocolate Pear Pudding (Nigella Lawson’s no-fuss recipe)

Chocolate Pear Pudding01

Having cooked the poached pear in red wine, I still got several beautiful pears in my fridge. While wondering how I could use up the in-season lovely pears, Nigella Lawson’s cooking show of making chocolate pear pudding came just in time. She always shows cooking delicious dishes without any fuss or pressure. Take a look at the recipe below, you'd see how easy to make the dessert. This luscious chocolate pudding became a perfect ending to our dinner last week.

Chocolate Pear Pudding, adapted from:Nigella Lawson’s Chocolate Pear Pudding (Printable recipe)

Chocolate Pear Pudding02

Serves 6-8
Ingredients
  • 2 x 415g cans pear halves in juice
  • 125g plain flour
  • 25g cocoa powder
  • 125g caster sugar
  • 150g soft butter, plus extra for greasing
  • 1 teaspoon baking powder
  • 1/4 teaspoon bicarbonate of soda
  • 2 eggs
  • 2 teaspoons vanilla extract
Chocolate Pear Pudding Procedures

Method:
  1. Preheat the oven to 200°C/gas mark 6 and grease a 22cm square ovenproof dish with butter.
  2. Drain the pears and arrange them on the base of the dish.
  3. Put all the remaining ingredients in a food processor and blitz until you have a batter with a soft dropping consistency.
  4. Spread the brown batter over the pears, and bake in the oven for 30 minutes.
  5. Let stand out of the oven for 5 or 10 minutes and then cut into slabs - I cut 2 down and 2 across to make 9 slices - and serve with chocolate sauce.

Chocolate Pear Pudding03

Notes:
  • The original recipe calls for canned pears so that it can be made throughout the year whenever you crave for. 
  • For making use of my stock of fresh pears, I cooked 2 pears with 2 tablespoons of sugar and 2 teaspoons of freshly grated lemon juice. The amount of sugar used depends on how sweet the pears you get and your preference.

©2026 Christine's Recipes - https://en.christinesrecipes.com/

Poached Pear in Red Wine

Poached Pear in Red Wine01

Is good food expensive? Not necessary. If this dessert is served at a fine dining restaurant, it might be. But if you cook it at home, you just need to spend a dollar or so.

Pears are in season here. Every pear looks perfect with high quality, yet sold at bargain price from supermarkets at the moment. A while back ago, when my daughter and I watched a MasterChef episode, but not sure which one, right at the moment when a beautiful poached pear dessert was presented, she asked me to cook one as she’s ever had tried before. How a big fan of pears could resist the temptation to try this gorgeous dessert? Fast forward to now, upon spotting several beautiful pears in our fridge, she brought up the same old question, then kept asking me the same question whenever she took one out to enjoy. Finally, I made this dessert to satisfy her craving. I really don’t know why I dragged it so long to make this simple, but heavenly delicious dessert.

Poached Pear in Red Wine (Printable recipe)

Ingredients:
  • 2 pears, peeled
  • 200 ml red wine
  • 100 gm sugar, or to taste
  • 1 cinnamon stick/cinnamon quill
  • 2 strips orange rind, each size about 1x3cm

Poached Pear in Red Wine Procedures

Method:
  1. In a deep, small saucepan, combine sugar and wine. Cook over medium heat, uncovered, stirring to dissolve sugar.
  2. Add remaining ingredients into the saucepan. Place a piece of baking paper on top, cover with a lid. Reduce heat to simmer for 15 minutes. Turn to other side, continue to cook 15 minutes. Repeat this step, until the pears are evenly tinted, softened and absorb the flavours of sauce. Turn off the heat and let cool slightly in the sauce. Serve pears at room temperature or still slightly warm, drizzled with sauce, and cream if desired.

Poached Pear in Red Wine02

Notes:
  1. Placing a piece of baking paper will keep the top of pears moist while cooking
  2. Simmer pears on low heat. Don’t use too high flame, otherwise the outside would easily be broken down while the inside is still stiff.
  3. The longer the cooking time, the deeper colour of the pears you'd get.

©2026 Christine's Recipes - https://en.christinesrecipes.com/

Strawberry Yoghurt Ice Cream

Yoghurt contains a kind of good bacteria, called lactobacillus that helps build our digestive system healthy. When we catch a flu and need to take any antibiotics, we'd feel our appetite decreases too. Why? The antibiotics help us to kill the bad guys (harmful bacteria) in our digestive system, unfortunately at the same time they kill the good guys (good bacteria) too. The lactobacillus is the good guy we need then. Yoghurt is rich in protein, calcium, and other vitamins.

The fruit I like the most to add into yoghurt is strawberry. Although summer hasn’t come yet, I love to take as much as yoghurt ice cream as I love. It’s a really good dessert after dinner throughout the year.

If anyone asks me where to get great ice cream recipes and ideas, I won’t hesitate to recommend David Lebovitz’s blog to him/her. David Lebovitz has generously shared heaps of useful information about how to make delicious home-made ice cream. One of his popular cook books, The Perfect Scoop: Ice Creams, Sorbets, Granitas, and Sweet Accompaniments is surely a keeper too.

Strawberry Yoghurt Ice Cream01

Strawberry Yoghurt Ice Cream (Adapted from David Lebovitz’s Vegan Strawberry Ice Cream)
(Printable recipe)

Ingredients:
  • 430 gm fresh strawberries
  • 2/3 cup sugar, or to taste (depends on how sweet your strawberries are)
  • 1 cup plain yoghurt (I used Greek yoghurt)
  • 2 tbsp honey, or to taste
  • 1 tsp fresh lemon juice (optional)

Strawberry Yoghurt Ice Cream Procedures

Method:
  1. Slice the strawberries and toss them with the sugar, and let them macerate for one hour at room temperature.
  2. Puree the berries and their liquid with a standard or immersion blender. You can puree it until completely smooth and strain out some or all of the seeds by pressing the mixture through a mesh sieve. Or you can leave it slightly chunky and omit straining it. 
  3. After draining the berries, stir in the yoghurt and honey and combine well. Adjust the amount of honey to your personal liking.
  4. Taste, and add lemon juice if desired.
  5. Chill thoroughly, then freeze in your ice cream maker according to the manufacturer’s instructions.

Greek Yoghurt

Note:
  • Greek yoghurt, compared to other kinds of yoghurt, is thicker, smoother and creamier. The end result of using Greek yoghurt was very satisfied. I highly recommend it when it comes to making yoghurt ice cream.

Strawberry Yoghurt Ice Cream02

©2026 Christine's Recipes - https://en.christinesrecipes.com/

Banana Chiffon Cake

The texture of this banana chiffon cake is a bit like the kind of Japanese cakes, very light and fluffy.

Prep time: 20 mins
Cook time: 40 mins
Yield: Prepare a 8inch (20cm) round cake mould, removable base preferred

Ingredients of batter:
  • 80 gm cake flour
  • 3 egg yolks
  • 14 gm caster sugar
  • 35 gm vegetable oil
  • 45 gm milk
  • 1/8 tsp salt
  • 2 ripe bananas, about 240 gm
Ingredients of egg whites:
  • 4 egg whites
  • 40 gm caster sugar
  • 1/2 tsp cream of tartar
Method:
  1. Preheat oven to 165C (330F). Use a small food processor to process the bananas into paste. Set aside.
  2. Mix the egg yolks with 14 grams of sugar until smooth. Add oil, milk and mashed bananas. Combine very well. Sift in cake flour, incorporate all ingredients well until you get a smooth batter.
  3. Use an electric mixer to beat egg whites first for a while until bubbles form. Add cream of tartar. Add one third of the 40 grams of sugar at a time. Combine well between the adds, until stiff peaks form. (Please refer to this video, showing how to beat egg whites, that I uploaded on youtube.)
  4. Fold in the egg whites into the batter. Add one third of egg whites at a time in order to easily incorporate the egg whites (Also, here’s a video of showing how to fold-in the egg whites).
  5. Transfer the batter into the cake mould that shouldn’t be non-stick or greased. (The mould you use is very important to get the best result. It helps the cake avoid from shrinking too much after removing from the oven, once the temperature drops.) Pop in the preheated oven and bake for 55 to 60 minutes. Test it by an inserted needle coming out clean. Remove from oven and immediately revert the cake mould upside down on a wire rack. Let it cool completely. Carefully remove from the cake mould. Enjoy!

©2026 Christine's Recipes - https://en.christinesrecipes.com/

Stir-fried Chicken with Mango and Roasted Almonds

Chinese New Year has started last weekend. I bet you ate a lot if you managed to celebrate CNY with your family as we did. We really need a light meal to get certain balance. So I cooked this Chicken with Mango and Roasted Almonds, that used fresh mango, adding a kick of roasted almond flavour.

This dish was actually recommended by my friend SK. I owed her so much, gave me lots of Taiwanese basils she's grown, and this time passed me a large mango. No, it’s a very large, extra large mango from another friend who grows a big mango tree in her backyard. Once I went home, I weighted the mango. The net weight of it was 450 grams, only for the mango flesh. It’s very huge indeed. It’s a kind of Australian mango, named R2E2, very sweet and juicy. The texture of the pulp is perfect for stir-frying.

Stir-fried Chicken with Mango and Roasted Almonds01

Ingredients:
  • 1 or 2 mango(es), ripe but not overly ripe (I used about 480 gm of flesh)
  • 200 gm chicken breast
  • 50 gm almonds
Marinade:
  • 2 tsp light soy sauce
  • 1/2 tsp sugar
  • 1 tsp cornflour
  • 1/2 tsp Shaoxing wine
  • 1 tsp water
Method:
  1. Use a sharp knife to cut the mango lengthwise next to the seed into three parts (two halves and a middle part with the seed). Carefully cut parallel lines through the two halves of mango flesh down to the skin. Scoop out the flesh with a tablespoon. For the middle part, peel the skin and cut the flesh off from the seed. Then cut mango into strips, about 3.5 to 4cm in length. Or you might like to cut into cubes to your liking.
  2. Rinse chicken and drain well. Remove fat. Julienne into 3cm strips. Mix with marinade for 20 minutes.
  3. Place almonds in preheated oven at 180C (356F) about 10 to 12 minutes, or until fragrant. Make sure not to burn them. Let cool. Place in a plastic bag, pound into small pieces. Set aside.
  4. Heat 2 tablespoons of oil over medium-high heat. Stir-fry chicken until done. Turn off the heat. Add mango, quickly combine all ingredients. Dish up and sprinkle roasted almonds. Enjoy!

Stir-fried Chicken with Mango and Roasted Almonds02

Notes:
  • You can cook this simple and delicious dish on the go. The key is to get really sweet and juicy mango. And the roasted almonds would bring this dish up to another level by adding very sweet fragrance, as well as crunchy texture.
  • If you can’t get very sweet mango, you might like to sprinkle a small amount of sugar to adjust.
  • My friend SK recommended slivered almonds initially. Unfortunately, I didn’t have any at home. Thus I roasted whole almonds and pound them into small pieces. If silvered almonds are used, just sprinkle over the dish after they are roasted.

©2026 Christine's Recipes - https://en.christinesrecipes.com/

Mango & Tapioca Pearls Dessert (Happy Australia Day)

Yesterday was Australia Day that falls on 26 January every year. It’s an official national public holiday for celebrations. Many friends of mine will make use of this opportunity to travel, or stay at home doing some gardening. For me, I like to hide myself in some cool places and enjoy some refreshing, cold drinks or chilled desserts as we are still in hot summer here.

This Mango and Tapioca Pearls Dessert was made with an Australian mango in season. It’s quite large, about 510 grams, juicy and sweet. I cooked some tapioca pearls to go with it. The texture of this dessert was like something between drink and pudding. We call it “露” in Chinese, roughly translated as “chilled dessert”. Hong Kong people like to use all kinds of fruit to make chilled dessert, including water melons, rock melons, lychees, all those favourite fruits in summer…Mango is the most popular choice in chilled dessert, I guess. When serving, you can also mix in some milk or coconut milk to add more flavours.
Mango & Tapioca Pearls Dessert01

Ingredients:
  • 1 large mango (about 510 gm)
  • 50 gm tapioca pearls (sago)
  • 3 Tbsp raw sugar
  • 100 gm ice cubes
  • milk, to taste (optional)

Mango & Tapioca Pearls Dessert02

Method:
  1. Soak tapioca pearls for at least 3 hours.
  2. In a sauce pan, pour in some water. The amount of water should cover all tapioca pearls. Bring it to a boil. Add tapioca pearls to the boiling water on medium heat. Stir them constantly and make sure that they don’t stick together. After cooking for 15 to 20 minutes, remove from heat. Cover and let sit for another 30 minutes. The tapioca pearls should be translucent, without any white dots in the middle. They are done. If they are not ready, turn on the heat again and cook for a few minutes more. And then let sit for a while again. Drain tapioca pearls and rinse under cold water. All tapioca pearls should be cool to the touch.
  3. Cut mango into cubes, about 1 1/2cm in size. Save 1/3 of them. Blend the rest of mango cubes, ice cubes and sugar in a food processor into thick juice, about 1 to 2 minutes. Transfer into a large bowl. Mix in tapioca pearls.
  4. To serve, divide mango juice with tapioca pearls into 3 to 4 small ramekins, top with mango cubes. Serve cold.

Mango & Tapioca Pearls Dessert03
(Pour in milk or coconut milk to add more flavours)

©2026 Christine's Recipes - https://en.christinesrecipes.com/

Pandan Panna Cotta with Mango and Passionfruit

As Christmas is coming around the corner, I know most of my friends are getting ready for celebration. How do you celebrate this year? Me, I might cook some special dishes or go for parties. I won’t feel a Christmas dinner be a fulfillment if without any dessert. I think this special dessert, pandan panna cotta will suit Australia’s hot Christmas. Yes, I know, panna otta is a well-known Italian dessert, only cooked with milk and cream. I tried to add an exotic twist by infusing the custard with the delicate fragrance of the pandan leaf. By mixing the Australian mangoes in season with tropical passionfruit, the taste of the dessert turned out to be so unique and super delicious.
 Pandan Panna Cotta with Mango and Passionfruit
Serves 6

Ingredients:
  • 4 tsp gelatine powder
  • 250ml milk
  • 100 ml coconut cream
  • 70 gm caster sugar
  • 2 stalks pandan leaves, tied in a knot
  • 300 ml pouring cream
Mango & passionfruit:
  • 2 mangoes, cut into cubes
  • 6 passionfruit pulps
  • Mint leaves, to garnish
Cook Pandan Leaf
Method:
  1. Put 3 tablespoons of water in a bowl. Sprinkle gelatine powder evenly over. Leave the gelatine to sponge and swell.
  2. Add the milk, coconut cream, sugar and pandan leaves in a small saucepan. Heat over low heat and simmer for 10 minutes to infuse the flavours. Be sure not to boil the milk. Remove from the heat and leave to infuse for another 10 minutes. Discard the pandan leaves.
  3. Add in the sponged liquid to the warm milk and stir until completely dissolved. Strain the milk into a bowl through a fine sieve and chill in fridge until half set.
  4. Whip the cream until soft peaks form. No need to beat too long. Gently fold the whipped cream into the milk mixture and pour into six jelly/custard moulds. Refrigerate until completely set.
  5. Combine the mangoes and passionfruit and mix well.
  6. To serve, briefly dip the base of the moulds into hot water, then turn the panna cotta out onto individual serving plates. Drizzle with mango and passionfruit and garnish with a mint leaf.
Notes:
  • I was not able to find any fresh pandan leaf here, so just used the frozen one. Still good in smell though.
  • If anyone can’t get any pandan leaf, substitute 1 teaspoon of pandan essence in the milk mixture to give a kick if desired.
 Pandan Panna Cotta with Mango and Passionfruit03

    ©2026 Christine's Recipes - https://en.christinesrecipes.com/

    Lemon Tart Recipe

    These lemon tarts are so elegant and especially delightful for afternoon tea. The fragrance of lemon is so tempting and its sourness just balances the sweetness of crust. Every time I make this tart, it becomes a big hit in my family.

    Lemon Tart 01

    Prepare 4 round 10cm tart moulds

    Ingredients
    Sweet crust:

    • 125 gm plain flour
    • 1 large egg yolk
    • 100 gm cold unsalted butter
    • 50 gm caster sugar
    • 1/8 tsp salt
    • 1 to 2 Tbsp ice-cold water
    Lemon Tart Ingredients

    Lemon curd filling:
    • 2 Tbsp unsalted butter
    • 1 large egg, lightly beaten
    • 1 lemon zest
    • 40 ml fresh lemon juice
    • 2 egg yolks
    • 60 gm caster sugar
    • 1 tsp icing sugar
    • 8 slices lemon, for garnish
    Method

    Lemon Tart Procedures

    To prepare sweet crust:
    1. Combine the flour, salt and sugar in a medium bowl.
    2. Cut the butter into small chunks and add to the flour mixture. Use a pastry blender if you have, or just use knives in a criss-crossing motion, blend the butter into the flour mixture until it has the consistency of damp sand, with a few pea-sized pieces remaining. (Note: don’t use hands, the butter would melt quickly otherwise.)
    3. Use a fork to beat the egg yolk with cold water. Slowly pour the egg mixture over the flour, stirring until the mixture becomes moistened. The dough should stick together and be able to hold the form of a ball.
    4. Cover the ball with plastic wrap. Smooth the ball of dough with a rolling pin to form a flat disc that fills the corners of the plastic wrap. Chill in the refrigerator for at least 30 minutes. (Note: If it has been chilled for a long time, it may need to soften slightly at room temperature before use.)
    5. Unwrap the disc and place on a lightly floured surface. Roll the dough from the center of the disc to the edge, until the crust is the desired thickness. If the dough is sticking to the rolling pin, try placing a sheet of plastic wrap over it and then rolling it out.
    6. Use a cookie cutter to trim out 4 dough discs with around 0.5cm bigger than each tart mould in size. Place the dough into each tart mould. Carefully press the dough into the tart moulds. If any cracks appear during the transfer, use lightly floured fingers to push the seams back together. Trim the excess from the edges of the tart moulds. (Note: practice makes things perfect.)
    7. Prick the surface with a fork and chill for 10 minutes in the freezer. Bake blind for 20 minutes.
    8. Remove from the oven and brush the base of the tarts with lightly beaten egg. Return to the oven for 10 to 15 minutes, until the base of the crust is golden. Transfer to a wire rack to cool.
    Lemon Curd

    To prepare lemon curd filling:
    1. In a medium bowl, whisk the lemon juice, the egg, egg yolks and sugar until smooth. Transfer the mixture to a heavy-based saucepan and cook over medium heat until the mixture begins to thicken, about 10 minutes. Beware not to let the mixture boil.
    2. When the curd is thick enough to coat a wooden spoon, reduce the heat to low and continue cooking for 10 more minutes. Remove from the heat and stir in the butter, until melted. Strain the curd through a fine sieve into a medium bowl and stir in the lemon zest.
    To decorate tarts:

    Lemon Tart 02
    1. Pour the lukewarm curd into the tart shells. For ease of slicing, chill for at least 1 hour in the refrigerator.
    2. Dust with icing sugar and garnish with lemon slices. Refrigerate any remaining tarts for up to 3 days.

    ©2026 Christine's Recipes - https://en.christinesrecipes.com/

    Shrimp, Avocado and Dragon Fruit Salad Recipe

    When summer comes, salad is a very popular dish on our table. This shrimp and avocado salad is our family’s favourite one. In last summer, I added one more healthy and terrific fruit in it. Guess what? It’s dragon fruit, a very delicious and nutritious fruit. There are two varieties of dragon fruit, one with bright red flesh and the other white, both have tiny black seeds. I bought the white one this time, adding my salad a striking colour.

    Shrimp, Avocado and Dragon Fruit Salad

    Serves 4

    Ingredients:
    • 150 gm medium shrimps (prawns), cooked, peeled, and deveined
    • 1 Tbsp olive oil
    • 1 tsp minced garlic
    • 1 ripe avocado
    • 120 gm lettuce (butter lettuce or red leaf lettuce)
    • 1/2 lime, juice
    • 1/2 dragon fruit

    How To Cut Dragon Fruit

    Method:
    1. Combine olive oil, lime juice and minced garlic in a bowl. If the shrimps are too big, chop them into halves. Toss in shrimps and coat with oil mixture well.
    2. Rinse lettuce and drain well. Arrange leaves of lettuce at the bottom of a large serving bowl or platter. Cut dragon fruit in half (see picture shown above). Use the tip of a sharp knife to cut cubes. Spoon out the cubes. The middle ones might be too long, cut into half then. Set aside.
    3. Use similar method to cut avocado in half. I normally don’t use sharp knife to remove the stone of avocado. Instead, I just use a small spoon to run around the stone, and then safely and easily spoon out the avocado stone. Cut avocado into dices, spoon out.
    4. Place half of the avocado cubes on lettuce. Add marinated shrimps, then followed by the other half of avocado. Toss in dragon fruit. Done.
    Note:
    • You can adjust the amount of lime juice to your taste.

    ©2026 Christine's Recipes - https://en.christinesrecipes.com/

    Baked Tapioca Custard Recipe (Variation of Tapioca Pudding)

    Are you a lover of tapioca pudding? I am and would always be. I’d like to cook a tapioca dessert and enjoy a warm night especially in winters. During our trip back to Hong Kong last month, I’ve tried baked tapioca custard, a non-Asian variation of tapioca pudding, several times at a Chinese restaurant. Not only was the dessert not expensive, but also was it downright sensational. Its smooth and creamy texture satisfied all the taste buds. Inside the baked tapioca custard, they added some sweet lotus paste, a popular way of presenting this dessert, I guess. Well, I felt my husband seemed not to be into the lotus paste though.

    Having come back to Australia, I got some time to play around and experiment baking my own version of this sensational dessert. Instead of putting lotus paste, I prepared some red beans that were cooked with a little piece of rock sugar. While baking the dessert, my husband proclaimed that he had had enough in Hong Kong and didn’t want to eat any more. What happened then? He finished a big bowl when the custard turned onto our dinner table. Surprise.

    Baked Tapioca Custard01

    Serves 3

    Ingredients:
    • 45 gm small tapioca pearls
    • 250 ml milk, divided
    • 2 Tbsp custard powder
    • 1 egg, lightly beaten
    • 50 ml evaporated milk
    • 45 gm sugar
    • 20 gm unsalted butter
    Baked Tapioca Custard Procedures
    Method:
    1. Preheat oven to 200C.
    2. Soak tapioca pearls in water at least 20 minutes. Drain well. Cook in plenty of boiling water on medium heat for 10 minutes, uncovered. To avoid scorching, stir constantly while cooking. Turn off the heat, cover with a lid and let them stay inside the saucepan until translucent. Drain tapioca pearls and rinse under cold water. Drain well.
    3. Add custard powder in 100 ml milk, stir in the beaten egg. Set aside.
    4. Use a small saucepan, pour in evaporated milk and the remaining milk, together with sugar and butter. Heat the ingredients until butter dissolved and combined well. Stir in the egg mixture (3) and continue to cook. Stir constantly while cooking until thickens. Lastly, add cooked tapioca pearls.
    5. Fill custard mixture in ramekins half full. Put any fillings you like, lotus paste, red bean paste or chocolate. (The fillings I used this time were some red beans in whole shape. They were just cooked with a bit of rock sugar until barely softened.)
    6. Place ramekins in a tray half filled with water to keep custard moist while baking. Bake for 15 to 20 minutes until lightly brown. Serve hot.

    Baked Tapioca Custard02
    Notes:
    1. It is important to soak tapioca pearls before cooking. They will swell up and become entirely translucent in shorter cooking time.
    2. Don’t let tapioca pearls be unattended while cooking. Remember to stir occasionally.
    3. The baking time will vary depending on different powers of different ovens.

    ©2026 Christine's Recipes - https://en.christinesrecipes.com/

    Mini Banana Walnut Muffins

    Muffin is one of my family’s favourite snacks, simple and easy to make. My daughter just likes them baked with bananas. And I love walnuts very much. So, I planned to put both of them together to suit the taste of both of us. Yet, this plan was aborted! Why? She protested to eat any walnuts in her muffins. I simply put some walnuts in mine and hers just with bananas. Problem solved !

    Banana Walnut Muffins

    Makes 12 muffins

    Ingredients:
    • 3 or 4 ripe bananas (smashed)
    • 1/3 cup melted butter
    • 1/2 cup brown sugar
    • 1 egg, lightly whisked
    • 1 tsp vanilla
    • 1 tsp baking soda
    • 1 1/2 cup all-purpose flour
    • 1/2 cup walnuts (optional, toasted and chopped)
    • pinch of salt
    Banana Walnut Muffins Procedures01 Banana Walnut Muffins Procedures02

    Method:
    1. Preheat the oven to 180C. With a spatula or wooden spoon, mix butter into the mashed bananas in a large mixing bowl.
    2. Add brown sugar, egg and vanilla, mix well. Sprinkle the baking soda and salt over the mixture and stir well.
    3. Add the flour, mix well and fold in the chopped walnuts.
    4. Pour mixture into a muffin tin. Bake for 25-30 minutes. Insert a toothpick into the center of a muffin, if it comes out clean, it’s done. Cool on a rack.

    ©2026 Christine's Recipes - https://en.christinesrecipes.com/

    Apricot Upside-Down Cake

    I guess that anyone who wants to experiment baking cakes won’t miss to try the upside-down cake. It’s very simple to get it done with good results easily. You can replace apricot with any kind of fruit you like. Sounds good?

    My daughter has a sweet tooth and keeps requesting a piece of dessert after dinner. So I have to control her sugar intake. Normally I won’t bake a cake using excess sugar. However you might like to double the amount of caster sugar used in this recipe, or adjust to your taste.

    Apricot Upside-Down Cake02

    Ingredients:
    • 130 gm butter (100gm chopped, 30gm melted)
    • 300 gm apricot, stones remove, sliced (if using canned apricot, drain well)
    • 1 1/2 cups self-raising flour, sifted
    • 2 Tbsp brown sugar
    • 1/2 cup caster sugar
    • 1 tsp vanilla essence
    • 1/2 cup assorted fruit
    • 3 eggs
    • Vanilla ice-cream, to serve

    Apricot Upside-Down Cake Procedures

    Method:
    1. Preheat oven to 180C. Prepare a 20cm round non-stick cake pan.
    2. Melt 30 gm butter. Drizzle evenly over pan base, and sprinkle with brown sugar. Spread apricot evenly on pan base, cut-side down.
    3. In a large bowl, using an electric mixer, cream chopped butter, caster sugar and vanilla, until pale and creamy. Add the eggs one at a time, and mix until just combined.
    4. Fold through flour and assorted fruit. Spoon mixture over apricots, smoothing top.
    5. Bake for 50 to 60 minutes, or until cooked when tested. Serve warm, cut in wedges, with vanilla ice-cream.
    Apricot Upside-Down Cake01

    ©2026 Christine's Recipes - https://en.christinesrecipes.com/

    Fruit Custard Tarts (Quick and Easy Dessert Recipes)

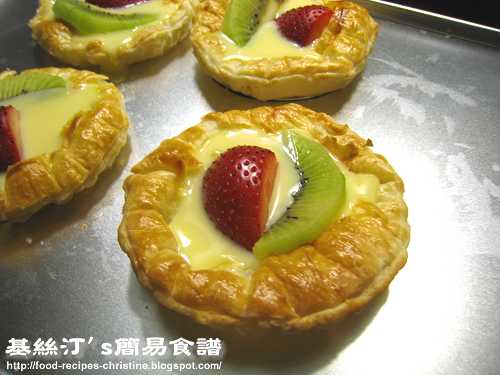
    This Fruit Custard Tart dessert can be done within 20 minutes. Pretty easy and simple! My lovely daughter has a sweet tooth. Whenever she wants to eat something sweet after dinner, I’d cook this dessert for her if I don’t have much time to prepare something else which is more sophisticated. Kiwi fruit and strawberry are in season in Australia right now. I can get many of them from grocery stores at a very good price. Here I used them to bake these yummy fruit custard tarts.

    Fruit Custard Tarts

    Ingredients:

    1 fat-reduced puff pastry (available at any supermarkets)
    1 kiwi fruit, peeled and sliced
    4 strawberries, sliced
    5 Tbsp low-fat vanilla custard
    1/2 whisked egg

    Fruit Custard Tarts Procedures

    Method:
    1. Preheat oven to 200C.
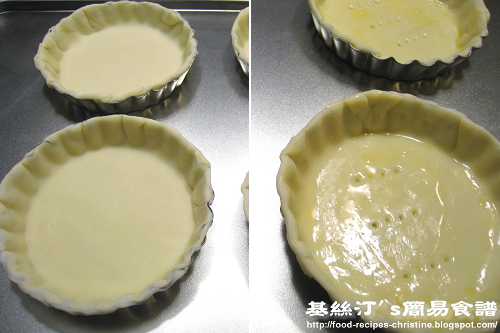
    2. Defrost pastry at room temperature until soft. Cut into 4 equal squares to fit into tart molds (8.5cm). Trim the pastry with a knife or a pair of scissors. Brush on whisked egg. Use a fork to poke the bottom of the pastry 3 to 4 times. Bake for about 10 to 12 minutes, or until brown and crisp.
    3. Pour custard into each tart, arrange kiwi fruit and strawberries. Put tarts back into oven and bake for another 5 minutes to warm up the custard. Or enjoy the tarts with cool custard and fruit. Either way would be fine and delicious.

    Fruit Custard Tarts02

    ©2026 Christine's Recipes - https://en.christinesrecipes.com/